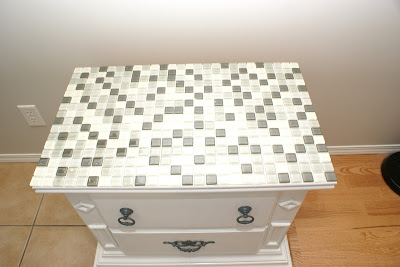
This is a project we completed a few months ago and I thought I'd show it off.
This used to be the night stand that goes with our bed set. Seeing as our bedroom is tiny and it doesn't fit in there, it now serves as a hallway stand and is the main dumping ground for EVERYTHING as we walk in the door. We originally just painted it white, but with such high traffic, the top was getting very scratched.
At Home Depot, we grabbed two 'square foot' sheets of glass tiles for about $15 each. We figured out the layout, cut to size and then transferred our "design" to the floor.
We also bought pre mixed Adhesive & Grout (about $9) and a notched trowel (about $4). We have lots of grout left over which we'll be using when we tile our kitchen back splash.
We also bought a log plastic rail/ edge that is meant to give the whole project a clean edge, but we ditched it because we thought it looked funny.
First, we slapped on the grout, then spread it out evenly.
Then we placed the tiles on top. We had already cut, measured and figured out the placement of the tiles, so we just transferred our design from the floor to the table top.
More grout, more tiles...
Then we pressed down on the tiles firmly so they would take hold on the grout.
We then let it sit for a week because we were busy working. We only needed to let it sit for 24 hours though...
The following weekend, hubby went back and covered all the tiles in grout, making sure to fill in the gaps between each tile.
We then let it sit for a few hours then grabbed a wet sponge and rubbed the grout off the top of the tiles.
And here is our (almost) finished masterpiece (we went back and fixed up a few of the imperfections you can see here - gaps in the edges etc.). I am no longer afraid that I am going to scratch the top of the furniture; these tiles are taking a beating and they are holding up very well. I think it also adds a bit of pizazz to the front entrance and makes the piece look a little bit less like a nightstand.
For a first attempt at tiling, I am pretty proud of our efforts and *think* we might be able to tackle the back splash ourselves when we renovate our kitchen.

This used to be the night stand that goes with our bed set. Seeing as our bedroom is tiny and it doesn't fit in there, it now serves as a hallway stand and is the main dumping ground for EVERYTHING as we walk in the door. We originally just painted it white, but with such high traffic, the top was getting very scratched.
At Home Depot, we grabbed two 'square foot' sheets of glass tiles for about $15 each. We figured out the layout, cut to size and then transferred our "design" to the floor.
We also bought pre mixed Adhesive & Grout (about $9) and a notched trowel (about $4). We have lots of grout left over which we'll be using when we tile our kitchen back splash.
We also bought a log plastic rail/ edge that is meant to give the whole project a clean edge, but we ditched it because we thought it looked funny.
First, we slapped on the grout, then spread it out evenly.
Then we placed the tiles on top. We had already cut, measured and figured out the placement of the tiles, so we just transferred our design from the floor to the table top.
More grout, more tiles...
Then we pressed down on the tiles firmly so they would take hold on the grout.
We then let it sit for a week because we were busy working. We only needed to let it sit for 24 hours though...
The following weekend, hubby went back and covered all the tiles in grout, making sure to fill in the gaps between each tile.
We then let it sit for a few hours then grabbed a wet sponge and rubbed the grout off the top of the tiles.
The tiles then appeared through, nice and shiny.
And here is our (almost) finished masterpiece (we went back and fixed up a few of the imperfections you can see here - gaps in the edges etc.). I am no longer afraid that I am going to scratch the top of the furniture; these tiles are taking a beating and they are holding up very well. I think it also adds a bit of pizazz to the front entrance and makes the piece look a little bit less like a nightstand.
For a first attempt at tiling, I am pretty proud of our efforts and *think* we might be able to tackle the back splash ourselves when we renovate our kitchen.


