Showing posts with label Tricks and Tips. Show all posts

Sunday, June 17, 2012

DIY Tiled Table Top Tutorial

This is a project we completed a few months ago and I thought I'd show it off.
This used to be the night stand that goes with our bed set. Seeing as our bedroom is tiny and it doesn't fit in there, it now serves as a hallway stand and is the main dumping ground for EVERYTHING as we walk in the door. We originally just painted it white, but with such high traffic, the top was getting very scratched.


At Home Depot, we grabbed two 'square foot' sheets of glass tiles for about $15 each. We figured out the layout, cut to size and then transferred our "design" to the floor.


We also bought pre mixed Adhesive & Grout (about $9) and a notched trowel (about $4). We have lots of grout left over which we'll be using when we tile our kitchen back splash.
We also bought a log plastic rail/ edge that is meant to give the whole project a clean edge, but we ditched it because we thought it looked funny.


First, we slapped on the grout, then spread it out evenly.


Then we placed the tiles on top. We had already cut, measured and figured out the placement of the tiles, so we just transferred our design from the floor to the table top.


More grout, more tiles...


Then we pressed down on the tiles firmly so they would take hold on the grout.


We then let it sit for a week because we were busy working. We only needed to let it sit for 24 hours though...
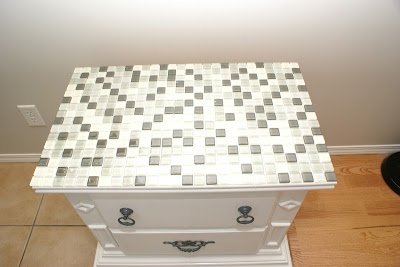

The following weekend, hubby went back and covered all the tiles in grout, making sure to fill in the gaps between each tile.


We then let it sit for a few hours then grabbed a wet sponge and rubbed the grout off the top of the tiles.


The tiles then appeared through, nice and shiny.


And here is our (almost) finished masterpiece (we went back and fixed up a few of the imperfections you can see here - gaps in the edges etc.). I am no longer afraid that I am going to scratch the top of the furniture; these tiles are taking a beating and they are holding up very well. I think it also adds a bit of pizazz to the front entrance and makes the piece look a little bit less like a nightstand.


For a first attempt at tiling, I am pretty proud of our efforts and *think* we might be able to tackle the back splash ourselves when we renovate our kitchen.

Monday, May 21, 2012

Cheap Dog Toy

Here's something I whipped up for Molly last week when she was driving me nuts (I was super busy and she was clearly bored). She loves new toys but, unfortunately, dog toys are so EXPENSIVE which I think is ridiculous, because she rips them to shreds and then tires of them a few days later. What a waste!


This is my upcycled version, using one of her favourite tennis balls and an old sock that lost its elasticity during the winter. I slipped the ball into the sock and nestled it into the hell of the sock. Then I tied two knots either side to keep the ball in place. It bounces when we throw it, it's a great tug-o-war toy and I have the other sock to slip the tennis ball into when she finally rips this one apart.

It's similar to the sweater sleeve + soda bottle toy I made a while ago (which she still adores). Any old clothing that the thrift store refuses or throws into land fill could be reused this way.


Basically, she loves old clothing tied around something hard. I could just shove any of her preexisting hard chew toys into a sock and wait a few days for her to fish it out.

What else could I shove into a sock/ sweater sleeve? I'd love your opinions/ feedback!!!


Wednesday, February 22, 2012

No-measuring Fabric Boxes


I am sure I am not the first to figure this out, but after lots of experimentation at my sewing machine today, I have an awesome box pattern to show you. It involves only 4 seams and a hem. I have used this pattern before, actually, when I made my sewing machine cover.

Actually, I don't know if I can call it a pattern. There are no measurements involved. I read a blog post lately where someone said they 'eyeballed it', so I guess that's what I did today too.

And before I start, I need to mention that I am terrible at sewing. But, because every cloud has a silver lining, I am awesome with a quick unpick. And I am not going to let my faults stop me from sharing this with you.

First of all, you need to make a little pillow-case like sack. If you can do this without instructions, skip to step 3. Or, just grab a pillow case!

1. Grab a strip of fabric. Cut the long edges with pinking shears and roll and iron the short edges.


2. Fold in half lengthways and sew up the side seams. Hem the top edge.


 3. Not sure how to describe step 3, so I'll let the picture do the talking. With the bag still inside out, sit it like this:


 4. Next, you are going to sew over the corners you created (the red lines in the picture below). This is the 'eyeballing' part that I mentioned before.


5. Once you have sewn the corners, flip the box inside out to make sure they are in the right place.


Looking at the bottom, you can see the 4 seams that you have created:


6. If you're satisfied with it, then go ahead and chop off the corners.


 And viola! You have a box!


I also used this method to make a little denim box using the leg of some old jeans. And I am sure there are other ways to use this very simple method. I was wondering if a pillow case would be the correct size to make a crate liner? Or if I could jazz up an old cardboard box by actually measuring it... Time will tell!!!

Happy crafting!

Monday, February 20, 2012

Neck Tie turned Cable Tamer

I am not sure what to call this invention... so I have dubbed it a cable tamer.

Here is the problem:


The appliance is super close to the power outlet, so I don't need the 3' cable that comes with it. It's puddling on the floor, collecting dust and dog hair. So, creativity to the rescue.


I have seen this done with a toilet paper roll on Pinterest, but have devised my own 'laundry-proof/ fabric' design so that as it gets dirty (and it will, being so close to the dog floor) I can toss it in the washing machine.

I wanted a neutral colour that would blend in with the cable and I had just the thing - one of hubby's old neck ties.


I had previously shoved a tp roll onto all the cables and knew that it was a good fit, so I found the point at which the tp roll and the neck tie were the same size.


I then chopped out that section, discarded the innards (who knew there was so much stuff inside a neck tie???) then hemmed both ends.


I then went back and shoved the excess cord into it. The whole process took about 5 minutes.


Problem solved.

Hallway Mirror Dry Erase Board

I have seen loads of cute dry-erase boards on Pinterest, made with frames and scrapbooking paper. They are oh-so-adorable and designed to match your chosen colour scheme, but I thought I'd show you my much cheaper and less time-consuming version. You probably already have everything you need already in the house. And this version takes about 1 minute. No joke.

Here's what you need to do:

Step 1: Find a dry erase marker.
Step 2: Write on your hallway mirror.


We don't have much space around here (have I mentioned our apartment is only 660 square feet?) so wall space is a luxury. I simply don't have enough wall space to hang another framed glass surface. So we use our entrance hallway mirror instead.


It is one of the last things we see as we leave our apartment, so it's great for shopping lists and errands (return library books!!!).

Here is the hallway and you can see the mirror on the right:


I'd love to hear your tips and secrets for having an organized home with little (or no) budget.

On a completely different note, I have been stalking LOADS of other blogs lately and am discovering 'Linky Parties' whereby everyone just shows off everyone else's blog posts using an external host. Neat idea. I have seen a bazillion different crafts (and I thought Pinterest was time consuming!) and I love sharing ideas. What an amazing and productive blogging community we have out there.

In celebration of the parties I have been linking up at, I have added another tab up the top to feature all of their buttons. Take a peek!!!


 Have fun!


Wednesday, February 8, 2012

Dry Rice Saves a Soggy Flash Drive

The flash drive I use to store and transfer all my work documents is super clean now, after it went for a ride in the washing machine in one of my pockets.

Woops.

But...

I had once heard that if your Blackberry goes for a swim, you should pull it apart and submerge all the pieces in dry rice for a day or two, to fully dry it out. Then it should be good to go again.

We figured it was worth a shot with my flash drive...

So, here's a tiny bowl with a little bit of rice.


Then I completely covered it up and left it for 48 hours. Not sure if it needed that long, but I didn't want to risk shoving something soggy into my USB port.


And I am pleased to say it worked! Hooray! All my files are exactly where I left them and are now backed up.

I realize that a flash drive is not a superbly complex machine so I wonder if this method could actually save a Blackberry... but it's worth a shot.

Monday, February 6, 2012

Decorate Mason Jars and Coffee Cans Different Ways

Thought I'd share a few of the different jar/coffee cans I have on display in my craft desk. Seeing as the cupboards above my desk have glass doors, it's vital that my craft supplies are stored in a pretty and chic way.


So, from L-R these are my suggestions:

1. Put the right items at the front. My mini glitter glue collection looked crazy with all the colours showing, until I realized I just had to shove the blue/green colours to the front to match my craft desk decor.

2. Re-purpose an old sweater. See this previous blog post.

3. Put pretty items in. I am not going to decorate this tiny glass mason jar because it's holding shells and they are pretty enough on their own.

4. Wrapping paper. Enough said.

5. Stickers and Frosted Glass Spray Paint. I would love to pick the stickers off to leave little circles of clear glass, but I had another jar go horribly wrong when I tried it, so the white stickers are staying on for now.

6. Paint Chips on a coffee can. See this previous blog post.

So there you have it! I never throw away a glass jar or a coffee can, so keep posted to see if I come up with any other ideas :)

Sunday, February 5, 2012

Thread Spool/Bobbin Storage

Until today my thread spools were lumped in a pile in an old coffee can. It was difficult to find them and the threads always came loose and created such a mess. But not anymore...


I hammered a few nails into the doors of the shelves above my secretary desk...


... then shoved the spools on.


Now when I open the doors, my spools are easy to see, easy to reach when sewing and, most importantly; not tangled! Hooray!