Showing posts with label For Kids. Show all posts

Tuesday, February 14, 2012

No-Mess Painting with Feathers

Most of my students love painting with things that aren't paintbrushes. Lettuce. Pipecleaners. Ribbons. Oddly-shaped pieces of cardboard. You get the idea. The only problem with painting with flexible objects is the mess involved. My kids invariably end up with a squished piece of something that's too difficult to maneuver, and paint all over their hands. Some of the kids love it but some of them also hate it. Lets face it; not every child loves getting messy. When a 'I'm-not-touching-that' sort of child sees the other kids getting paint up to their elbows, they opt out of the activity and miss out on some great learning experiences.

Seeing as we recently did a unit on animals, I thought it might be neat to paint with feathers. After a quick rummage through our craft cupboard, I found a great way to limit the mess - clip a clothes pin to the base of it.


 I did my trial run with two children who dislike dirty hands and it worked!


They had a great time making tiger stripes with the feathers and didn't get much paint on themselves at all.


It has now made me think of all the other objects we could clip between a peg and use to paint; ribbons, yarn, pom-poms, scraps of felt or fabric.


I'll give it a go and let you know if it works...
Sunday, February 12, 2012

Candy-Free Valentine's Gifts for Kids

Valentine's Day never meant anything to me growing up. News reporters would comment on the number of roses sold and they might feature a few love stories with people getting engaged or an elderly couple talking about their secret to marriage. A few teachers at school might be sent flowers from their husbands, but it meant nothing to the kids. I didn't really have a problem with it.

Last year was my first Valentine's Day with Canadian children and it was a bit of a culture shock. First of all, it's commercial. There are cartoon Valentine's kits of every sort - Cars, Princesses, Toy Story. All you have to do is write your child's name on each pre-written card. And secondly, everyone participates. The kids had LOADS of candy. It was a tad overwhelming and I felt under prepared.

But not this year!!!

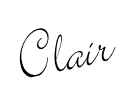
Thanks to this blog, I was able to create something cute to give to my kids that DIDN'T involve candy.


I purchased a 64 pack of Crayola crayons (about $7) and I already had the cello bags. I then used Photoshop to create the little bag tops.


It would have been lovely to just print the free ones from the blog, but seeing as our printer is running low on Cyan ink, I re-did it all with pink stripes instead and used a free rainbow graphic I found online.


Seeing as I was doing it all by scratch anyway, I printed the kids names on each one.


 So there you have it. Candy-free Valentine's gifts for 18 children DONE.

Sunday, February 5, 2012

Toddler Hopscotch

Thought I'd share an activity I did in class today.

After rising to the '100 Thing Challenge' (get rid of 100 unwanted/unused items from your house), I had a box full of unwanted junk.

In it were a few old IKEA place mats that were still in good condition so I didn't want to part with them just yet. So, as with most unwanted junk in my house, I took it to work for a re-purposed future.

I had 4 beige cloth ones and two green foam ones. I threw them down on the ground and the kids immediately turned it into a game of stepping stones/ hop scotch.

Last week we used bubble wrap with numbers on it, but it was a bit slippery at times.


These place mats didn't slip, regardless of how many little feet ran over them and it's a much safer option than walking over the blocks, as the children like to do when we are not watching.

I considered writing big numbers onto them, but the children then used some of them in the house centre (to set their table) and they also grabbed the foam alphabet letters and started sorting them by colour onto each of the place mats. The green ones were rather stiff so they were used as trays for carrying around various toys.

So, no numbers for now because clearly they are a versatile resource and I'd hate to confine them to one purpose. I wonder what else my little cherubs will use them for...

Tuesday, January 24, 2012

Detergent Container for Mixing Colours

We have sensory tables in my classroom and I am always trying to think of new ways to use them. This is an idea I came up with after finishing off the laundry detergent on the weekend and not wanting to throw away the container just yet. I thought the button was super cool and might help develop fine motor skills and strengthen muscles in little hands.

Soo... here's what we did. I was a bit late taking the photos, but the water in the sensory table was blue and the water in the detergent container was yellow. I propped the detergent container up on an overturned box so that the button was accessible.


I wanted the kids to press the button and see what happens when two colours mix.


They were so careful in not wanting the colours to mix at first, they were practicing great pouring skills between containers.


They had a hard time pressing the button with one hand, so they found ways to balance a container under the tap to free up both hands.


They were SO cute helping each other pressing the button. I heard, "It's a bit tricky, so I'll help you with it, buddy."


I thought they would get bored once the water was out of the detergent container, but they just turned the container up on it's side, took off the lid and poured lots of water back inside. It was building great hand-eye coordination skills trying to get the water into a smaller hole.


It was such a success that I don't think this container will be going out with the recycling for a while yet.

Sunday, January 15, 2012

Colour Match for kiddies

My three year olds are pretty clever. They can do all the colour naming/matching/sorting activities we do in class, so I have decided to take it to the next level.
From Pinterest inspiration (not sure where, but I am sure I did not come up with this idea on my own) I bring you my colour match activity.


First, I graciously swiped several colour swatches from our newly opened Canadian Tire. Actually, I took two of each colour, in case I messed up, but I managed to create it all with only one of each sample.


Then I cut a strip of each colour and glued it onto a peg. A long strip from the centre of the swatch (without the words on it), was then glued to the edge of a Styrofoam platter. Then I went nutso with my new glitter glue (Christmas pressie from my Mum-in-law) ... And, presto! All done!


Once the children get past arguing over who gets the pink pegs (I have a LOT of children who favour pink over all other colours), the idea is that 4 children will each have a colour to find, then attach to the side. Oh and seeing as many things seem to disappear from my classroom, I put my name on it. Tacky, I know, but necessary if I plan to get use out of it.


 All done! Actually, I had a moment where I messed up with the blue pegs so I hope it's not too challenging for my kids. Even if they can't match the shades correctly, they will at least benefit from finding their chosen colours among the others, and developing their fine motor skills with the pegs.

Thursday, December 15, 2011

Snowman Bags

I saw these cute bags and thought I might adapt them for my students' Christmas presents. My kids LOVE bags right now - we have several in our classroom which they carry around and fill up with toys etc.

Because I had 17 of these to make, I cut corners quite a bit. There is no drawstring - I just attached the string to the side and tied it in a bow. I realize the kids won't be able to do this again, but if it's tied in a loop, they will still have a handle to hold on to.

Because we are focusing on name recognition, I also wrote their names on the back.
And the bags are filled with a couple of candy bars (not at all healthy, but 'tis the season!) and some bubbles.

Saturday, December 10, 2011

Salt Dough Christmas Ornaments

This craft was a test run for what I want to do with my 3 year olds at work. Granted, I don't expect them to do anything too fancy, but I wanted to see how well salt dough worked and, more importantly, how quickly it dries out.

Recipe:
2 cups plain flour
1 cup salt
1 cup water

Drying time: An hour in the oven at 200F, flipping them half way. The thicker pieces air dried over a week after I grew impatient with the oven method.

The mixture was foolproof and the consistency will be great for 3 year olds. Our focus will be on using the rolling pins (the dough dries out best if rolled quite thin).

I am slightly concerned that they might try to eat the dough, but it's nothing their digestive systems haven't seen before.


I made two small circles, one with a letter on it, then painted them gold once dry. I then glued the circles back to back and wrapped twine around the edges (hot gluing as I went) but left a loop on the top.

These ones will be attached to Christmas presents under the tree for the in-laws, in lieu of a stick-on-Christmas-tag.